- Posts
- 1,565
- Likes
- 1,694
1.9.2 Model System Tutorial
With version 1.9.2 we now have a streamlined model addition system for creators to use for their add-on packs. This system will fully replace the current custom model system in the future, so make sure to update your packs accordingly!
With version 1.9.2 we now have a streamlined model addition system for creators to use for their add-on packs. This system will fully replace the current custom model system in the future, so make sure to update your packs accordingly!
With the new system comes a new PK3 directory: ext_data/cm
Within this new directory text based files can be added with the file extension
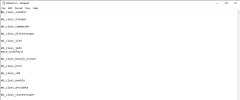
.cm. Each file should contain a list of classes, with each followed by the custom models for the class in the format model/skin. Note: you can name the .cm file to whatever you want.|
| mb_class_soldier = Imp Soldier mb_class_trooper = Reb Soldier mb_class_commander = Imp Commander mb_class_elitetrooper = Reb Elite Trooper mb_class_sith = Sith mb_class_jedi = Jedi mb_class_bounty_hunter = Bounty Hunter mb_class_hero = Hero mb_class_sbd = Super Battle Droid mb_class_wookie = Wookiee mb_class_droideka = Droideka (not supported) mb_class_clonetrooper = Clone Trooper mb_class_mandalorian = Mandalorian mb_class_arctrooper = Clone ARC Trooper |
Adding existing models:
Now with the new system, adding already existing models requires no copying of .glm files and .skin files. Now you can just reference whatever model already exists in MBII / Jedi Academy's assets. For example, if I wanted to add the Legends model of Old Captain Rex, I would navigate to the FAMBModels.pk3/models and figure out the model name. (If you are having trouble finding the specific model, you can also go into Assets3/ext_data/mb2/character to find the FA file that references said model) I have determined that the name is rex_old.
Pro tip: If you use the command
/model in the in-game console, it will display the model/skin information of whatever you are playing as.Now that I know the model name, I can see which skins the model has. In this case, it only has a default skin. So now we will go to our .cm file and add in
rex_old/default under mb_class_arctrooper.Note: An icon is required for custom models and if missing an error will be printed to the in-game console after loading. If that happens you will need to create your own mb2_icon_[skin-name] and save it within the model folder. There are templates to make icons using the Official MBII Modding Tools. If the custom model is for an FA-only model, it may already have an icon that would just need to be copied and renamed.
And that's it! You successfully added an existing model to your add-on pack by adding in one line of text. But what if you wanted an entirely new skin/model added?
Adding new models:
Just like with the previous iteration, adding new models will have to follow standard directory layout See here: PK3 Compendium. The only difference between the new system and old is how you are no longer required to follow the naming convention of models. It is recommended that if you are planning on creating a large pack, that you develop your own naming convention so that you can reduce the risk of conflicts with another pack. (For example: If two packs have the same modelname, but use different skins and glms, you can end up breaking both packs at once.)
Adding custom skins:
Let's say you made some custom skins for the phase 1 Clone trooper, and you want to add them as efficient as possible. Before you would have to duplicate the model to be able to add any custom skins. Now we can think a bit more creatively.
We can create a folder in models/players that we use to store our custom texture maps. (If you want an example, base MB2 clones are set up this way for organization: (MbModels3/models/players/MB2_Clones) Now that we have a place to store our texture maps, we can create a .skin file to be used for the Clone model. (Example: MbAssets3/models/players/clonetrooper_p1)
Now in your custom pk3, you want to add your custom skin file (Make the name unique) to models/players/clonetrooper_p1. This way, we can avoid recreating a .glm and save on pack space. And just like before, go into your .cm file and simply add in your model/skin.
Conclusion:
With these new changes, optimizing pack sizes can be increased greatly by decreasing the amount of copied GLM files that you will require. Always make sure you are trying to optimize as best you can.
With these new changes, optimizing pack sizes can be increased greatly by decreasing the amount of copied GLM files that you will require. Always make sure you are trying to optimize as best you can.
Last edited: